Unit 2 Projects
Pinch Pots
Small Animal
Choice Pinch Pot
Plan:
For this piece I decided to create a simple bowl. I wanted to have some sort of design on it as well
Plan:
My plan for this piece is to create a small bunny. My hope was to make it very cute and well executed.
Description:
I began this piece by creating a basic pinch pot, not too large in size. I then smoothed it out and started on my design. I decided to just to a simple flower design on the outside. This piece was lost so I was not able to glaze it. I am proud of this piece, but do wish I could've glazed it.
Description:

I began this piece by researching and finding a reference to go off of. I then started by shaping the head and body. After that I added the ears, and tail. I then added all the face details and the flower. I decided not to do Underglaze for this piece, instead I waited for it to be fired. After being fired, I used a low fire glaze to paint it grey with pink details. If I could do anything differently, I would make sure the glaze is more smooth and even.
.jpeg)
Pinch Pots Put Together
Plan:
For this piece I didn't have a original plan, I just knew I wanted some sort of decoration
Description:
This piece was definitely a work in progress, and I went through many ideas. I started by making a simple circle with two pinch Pots, then started molding the shape. I landed on the idea of doing a pumpkin, so that's how I formed it. After I made the basic shape I created all the details. Once this piece was fired, I used a low fire glaze to paint it. This piece is definitely one of my favorites, and I'm very proud of it.

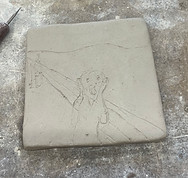
Mini Masterpiece
Plan:
My plan for this piece is to recreate The Scream by Edvard Munch. I want to create just a simple tile and create the design with underglaze
Description:
For this piece I started by creating a simple tile out of Venus white clay. I then outlined my design so I knew what to glaze. I then picked out my colors in Underglaze and started painting. After this piece was fired I added a few coats of clear glaze and fired it again. I am very proud of this piece and wouldn't do anything differently.
Choice Piece
Plan:
My plan for this piece is to create a q-tip and cotton pad holder. I want to have it a plain color, but with some sort of design. I also want it to be usable and well done.
Description:
For this piece I started by making two separate pinch pots. I then cut off a side of one of the pinch pots so I could put them together. After putting them together I shaped it and smoothed it to my liking. After I got the basic shape, I added my designs. I did designs on each side of the piece. After it was fired, I added a simple blue and white low fire glaze. I am very proud of this piece and wouldn't do anything differently

.jpeg)

Plan:
Historically Inspired
My plan for this piece is to recreate a pillar from the renaissance. We studied the different types in art 1 last year, which inspired me.
Description:
For this piece I started by finding a reference that I wanted to use. I then started forming the base of the pillar. After the base, I molded the two swirls on the top of the pillar. I then added all the details and indents. This piece did turn out how I wanted and I am very proud. I do think it looks like and actual pillar. I did not end up glazing this piece because I did not feel the need too.